Layout
On a desktop PC the overall size and shape of the calculator can be changed
by dragging the sides or corners to re-size the window. The keypads and

display automatically adjust themselves to fit the available space. You can

use this to make the calculator very small indeed, for example leaving only

the display visible, and using the <a href="accelmng.html">keyboard shortcuts</a>
to control it.
The calculator layout can be further
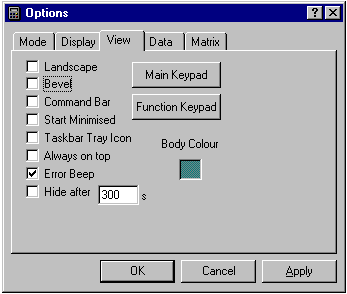
customised using the Options/Layout menu. This brings up the Layout dialog box.

The Layout dialog allows you to specify the orientation of the Main and
Function keypads. Normally the Function keypad has a larger number of smaller
buttons than the Main keypad, which has the main arithmetic keys. By default the
Function keypad sits above the Main keypad, but by checking the Landscape box
you can position the two keypads side by side. You will probably want to change
the width and height of the calculator to accommodate the new keypad positions.
On devices where there is only a limited width, like Palm-sized PCs, it doesn't
make much sense to select landscape mode.
In addition you can specify the colour of the
body of the calculator, and whether there is a
bevel around the edge of the calculator window. The bevel is not really necessary from Windows95 onwards because the default windows
already have a bevelled appearance, but it improves the appearance on older
versions of Windows and so it has remained as a largely vestigial feature.
Background Image
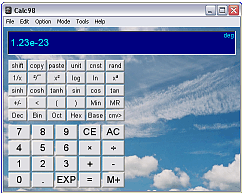
As well as choosing a background colour you can choose a background image.
(This feature is currently not available on Windows CE.) This must be in Windows
Bitmap format. You can either type the file name in the edit box or use the
Browse button to search for the file.

If you want to use an image which is in another format, JPEG for example,
you will need to convert it to a Windows Bitmap. There are many image
editing tools which can do this, including the Windows Paint utility which
can be found from the Start menu, Accessories section. Open the image in
Paint and then choose Save As... from the File menu. At this point you can
choose a different name for the image, or use the same name but with a
different file type. Then select 24-bit bitmap from the "Save as type" drop
down box, and save the image. It should now be possible to use the version
of the image with the Windows Bitmap (".bmp") file type as the background.</p>
Next to the Browse button there is a drop-down box where you can select the
image mode from copy, tile, stretch or grow. Copy will draw the bitmap image leaving the background colour visible in areas beyond
the image. Tile will cause the image to be repeated as necessary to cover
the background area. Stretch will expand or contract the image to fit the
background area. Grow acts in a similar way to stretch but
preserves the aspect ration of the original image.
Landscape
Check this box for main and function keypads side by side. Otherwise they are
aligned vertically (portrait).
At first sight landscape mode doesn't make sense on palm-size format devices.
But try the following in landscape:
Display:
Font: Tahoma, regular, 18
Main keypad:
Font: Tahoma, regular, 16
Rows: 4, Cols: 5, Width: 26, Height: 20, H Space: 1; V Space: 1
Function keypad:
Font: Tahoma, regular, 10
Rows: 6, Cols: 4, Width: 22, Height: 13, H Space: 1; V Space: 1
In matrix mode that gives 9 rows of array cells visible, although the same can't
be said for the function button legends unless you have good eyesight! If you
hold the stylus over the button the tooltip appears at normal size. If you are
using RPN with the visible stack enabled you will be able to see 9 levels of the
stack.
Bevel
Checking this option causes a bevelled edge to be drawn around the calculator
body. This is redundant on current Windows desktop systems because a bevel is
drawn by the user interface of the operating system.
Start Minimised
If you check this box the next time the program starts it will be minimised
to an icon. This option is particularly useful if you choose to have the
calculator start up automatically with Windows. This can be done by putting a
shortcut in the /Windows/StartMenu/Programs/StartUp directory. The setup
program can do this for you automatically if you check the "Start when Windows
starts" option. To add or remove the shortcut on subsequent occasions you can
run the setup program again, either by double-clicking on setup.exe in the
install directory, or using the Windows Control Panel application "Add/Remove
Programs". This will run the setup program with the option to remove or change
the installation. Select Change and then check the appropriate options.
Task bar Tray
Icon
This option causes the calculator to minimise as an icon in the Task bar Tray. You can combine this with Start Minimised as described
above so that the calculator is always running and readily accessible while you
are working at the computer.
Hide after..
The auto power off
feature means that after a specified number of seconds of inactivity the
calculator minimizes itself.
Always On Top
The always on top option keeps the calculator as the top-most window
at all times. It can still be minimized. This is useful if you are using it in
conjunction with an application that needs to use the whole screen area, so that
the calculator "floats" on top.
Error Beep
The calculator gives a beep sound if an error occurs. This can be disabled by
this check box.
Menu Bar
This check box enables or disables the menu bar which gives access to menu
items. It is possible to use the software without a menu bar, and many users
prefer not to have it. You can't disable the menu bar on Pocket PC devices.
Example:
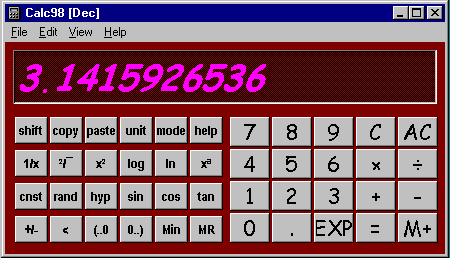
Using the options described above, the appearance of the calculator can be
greatly changed from the default to suit personal preference and screen
resolution. See the Display Tab for more information
about changing the appearance of the display.
An example customisation is given below:
