Working with Arrays and Matrices
By default, the dimensions of the display grid are set to a single cell. Many people regularly use the calculator without ever being aware that it can support matrices, or arrays of numbers, and many classes of problem do not require this feature.
But if you need to do matrix or vector arithmetic, solve sets of simultaneous
equations, work with complex numbers, convert between co-ordinate systems,
you will need to use this powerful feature. Please note
that if you are using a handheld computer with a version of WindowsCE prior
to 2.11 (generally the older devices) the matrix functions will not be available.
There are two ways of displaying a matrix or array, rather than single value. Either select Matrix mode using the Mode menu, or select the Mode/Matrix dialog and check the box to use arrays for all modes. In the first case the calculator will revert to a single display value if you select any other mode, whereas in the second case you can use arrays in conjunction with any of the calculator modes.
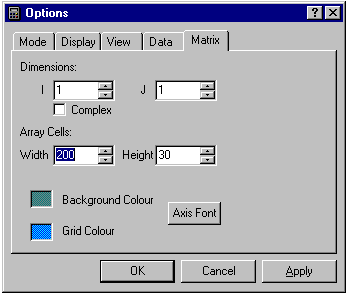
The dimensions of the display grid can be set using the Option/Matrix dialog. When using matrices, some functions are dependent on the choice of dimensions for them to be available.
It may be necessary to enlarge the display by changing the size of the
calculator window in order to see the grid of values. On WindowsCE (e.g.
Pocket PC) you will not be able to enlarge the whole calculator, but you can
make more display area available by reducing the size of the buttons, and
possibly discarding the fifth row of function buttons. You may also
need to experiment with the font sizes for both the buttons and the display.
You can also reduce the level of precision to make it possible to use narrower
columns.
The Option/Matrix dialog also allows you to change the size of the individual grid cells and their background colour. The font and colour within the cells is set using the Option/Display dialog as normal. The font for the axes can also be set along with the colour of the lines delineating each cell.
When matrix mode
is used, it is possible to select one or more cells in various ways as described
later. The selected cells are normally indicated by greying the others, but by
checking the "Invert highlight" box you can cause the selected cells to be shown
in inverted colours, so that the text and background colours are switched. This
can be useful on some kinds of display where the greying is not obvious.
Displaying Arrays and Matrices
Once you have selected the matrix mode, the display in some ways resembles a spreadsheet program. When using arrays of numbers, the display is divided into a number of array cells on a grid.
Simple arithmetic with arrays
When you first enter matrix mode you will see that all the array cells are
selected and that if you do a simple calculation it will be simply repeated
in each cell. This is how simple array arithmetic works, applying
each operation to all of the cells. If they all contain the same values then clearly this alone is not particularly
useful. But in array mode a number of buttons have new or enhanced
functions. For example, pressing the "rand" button now produces
an array of random numbers (make sure you are in decimal mode).
In the examples below we assume you are using algebraic logic.
If you are using RPN you need to enter the values onto the stack and use
the post entry operators in the normal way.
ind - Index
If you click the shift button the "rand" button becomes "ind", which gives
each cell the value of its own index. Now we can do something mildly
useful: select decimal, degree mode and make the array size 10 x 9. Click
on "ind" (SHIFT + rand). Click "+" then "1"
(notice how all cells are filled with 1). Click "=". All cells now
have the value of their own index plus one, i.e. values from 1 to 90. Now
click the "sin" button and you have a table of the sines
of whole degree angles. If the results look odd, check that you remembered
to set the angle mode to degrees.
Let's suppose you want to repeat this operation with other trigonometric
functions, square root, etc., but you don't want to have to compute the
index + 1 every time. Simply save the intermediate result to memory
using the "Min" button. All the memories work in array mode,
(although only the value of the first array element is visible in the dialog
when selecting the memory).
Selecting cells and ranges of cells
Initially, all the cells are selected, but you can also select an individual
cell by clicking on it with the mouse or with a stylus on pen-based
devices When you select a cell, the remaining cells are dimmed.
It feels quite natural to use the stylus in this way. You can also
select a rectangular group of cells by pressing the left mouse button on
one cell and releasing it after moving to another (on pen computers you
press the stylus on a cell and move the stylus across the display surface
and then release from another cell). Alternatively you can
select a single cell and then SHIFT+select another cell to indicate a range
of cells. You can scroll the display before the second of these operations,
making it possible to select a range of cells even if it is not possible
to view them all on the display at the same time.
Finally, you can use the keyboard (or virtual keyboard) cursor control
keys (arrow keys) to move the selection around. (This does not work
in "Time" mode, because the arrow keys control the stopwatch).
The HOME and END keys on the keyboard will select the very first or last
cells of the grid. If a range of cells are selected, the whole range
moves around the grid as you use the cursor keys. The "next" button
on the main keypad can also be used to advance a single cell at a time.
The keyboard INSERT (or INS) key does the same thing. This is useful if
you want to enter all the values in a matrix in turn.
You can select all the cells by clicking outside the grid if the display
area is larger than the grid, or using one of the techniques above.
If the grid is too big for the display you will get scroll bars to move
the grid and the area outside the grid will not be visible, but there is
a small button where the two scroll bars meet which can be used to select
all the cells. There is also a "Select All" option in the Edit
menu. Clicking on "AC" also selects all cells as well as deleting
the contents.
Once you have selected a single cell or a group of cells, all subsequent
arithmetic operations act on those cells only. Selecting an individual
cell allows you to make complete calculations on that one cell alone.
You can then move to another cell or include it in a larger group of cells
and do further calculations. Example: you want a table of numbers
and their square roots up to 10. First set the array dimensions to 2 x
- Select all the cells in the first column and click on "ind"
(shift "rand"). Select the second column and index it in the
same way. With the second column still selected click on the square
root button.
Using copy and paste
The copy button (or Ctrl-C keyboard shortcut) can be used to copy the contents
of the selected cell or cells into the clipboard. You can then select a
single
cell and use the paste button (or Ctrl-V on the keyboard) to copy the
data back starting at the location of the cell. If the dimensions
of the group of cells copied is too large for the array size specified
the extra data is discarded. If you make a selection of a group of
cells and then use paste, only the selected cells are updated from the
clipboard, even if the clipboard data contains a larger selection.
If the clipboard data contains a smaller group of cells than the selection
the cells beyond the range of the clipboard data are left unchanged.
Copying data to the clipboard also makes the data available to other
applications such as a word processor or spreadsheet. The same process
can be used in reverse to import data from other applications. Example:
using the example above, make sure all the cells are selected and click
on the copy button. Run a spreadsheet program such as Excel (or Pocket
Excel on a handheld device), select a cell and select Paste from the Edit
menu. The data are now pasted into the worksheet and can be further
processed, printed or incorporated into another spreadsheet. You can do
the same process in reverse, copying data to the clipboard within another
application and then pasting it into the array in the calculator.
You can use cut and paste within the calculator application as a convenient
way of copying or moving blocks of data within an array, or storing them temporarily for
a later stage in the calculation. Because the clipboard only allows you to store
one set of data at a time, you may need to make use of the memories for
more complex calculations. You should also bear in mind that data
is saved to the clipboard as text in whatever display format is currently
selected. This means that if you are only using a small number of
decimal places there could be a loss of precision compared with, say, using
the memory. It also means that if you store data in the clipboard
in, for example, hexadecimal mode and then switch to decimal mode, the
clipboard will still contain data in hexadecimal which the calculator will try to interpret
as decimal. This will probably not give the desired result.
Matrix arithmetic
Matrix arithmetic has special rules. Matrix addition and subtraction
are conveniently defined as the sum or difference of the individual elements
and this is the same as the simple array arithmetic operation described
above, which therefore needs no further work on our part.
Example: add the matrices
( 1  2 )     ( 0  4 )
( 3  4 )  +  ( 6  2 )
Set the array size to 2 x 2. Select the first cell using the mouse/stylus
or the HOME key on your keyboard. Press the "1" button, followed
by the "next" button (or the INS key). This enters one into
the first cell and moves to the next available cell. Enter
"2" then "next" which automatically goes to the next row.
Enter 3 and 4 in the same way. The final "next" selects all
the cells (remember that if a single cell is selected for the arithmetic
operation, it only acts on that one cell). Now click the "+"
button (if you are using RPN you will use Enter and "+" at the next
step). You enter the second matrix in the same way as the first,
"0", "next", "4", "next" and so on. Again
click "next" a final time to select all the cells ready for the
arithmetic operation. Then click on the "=" button for
the result:
( 1  6 )
( 9  6 )
Multiplying a matrix by a scalar
A matrix can be multiplied by a scalar very easily by entering the matrix
and then making sure all the elements are selected. Clicking the X
button followed by a value (which will appear in all cells) and then "="
will give the product.
)(
- Matrix product
The rules for matrix multiplication are more complicated. If we simply use
the multiplication button in the same way as the plus button above we will
carry out a scalar multiplication of the individual cells. Sometimes
we want to do this, but for matrix multiplication we need to use the appropriate
operator which is obtained by clicking the "shift" button, when
the "X" changes to ")(", the matrix multiplication operator.
Example: find the matrix product of the two square matrices
( 1  2 )     ( 0  4 )
(      )  x  (      )
( 3  4 )     ( 6  2 )
Result:
( 12   8 )
(        )
( 24  20 )
Two matrices may only be multiplied if the number of columns of the
first equals the number of rows of the second. If this is the case
the matrices are said to be conformable. When we enter non-square
matrices we simply ensure that the grid has at least as many rows and columns
as the largest matrix. Then we simply leave all the unused
elements as zero. The arithmetic deals with conformance, because
any non-conforming rows or columns will be multiplied by zero.
Example of multiplying non-square matrices:
( 1  2  5  1  0 )         ( 0  4 )
(               )    x    (      )
( 3  4  1  3  1 )         ( 6  2 )
(               )         (      )
( 2  0  1  6  2 )         ( 1  4 )
                          (      )
                          ( 3  8 )
                          (      )
                          ( 1  7 )
Make sure the grid dimensions are at least 5 x 5 and enter the
first matrix:
1 2 3 4 5 1 1 2 5 1 0 2 3 4 1 3 1 3 2 0 1 6 2 4 0 0 0 0 0 5 0 0 0 0 0
Use the matrix multiplication operator, )( ,
then enter the second matrix..
1 2 3 4 5 1 0 4 0 0 0 2 6 2 0 0 0 3 1 4 0 0 0 4 3 8 0 0 0 5 1 7 0 0 0
=
Result, a 3 x 2 matrix:
( 20  36 )
(        )
( 35  55 )
(        )
( 21  74 )
1 2 3 4 5 1 20 36 0 0 0 2 35 55 0 0 0 3 21 74 0 0 0 4 0 0 0 0 0 5 0 0 0 0 0
)/(
- Matrix division
For completeness, we have included a matrix division function which is
the equivalent to pre-multiplying the numerator matrix by the inverse of
the denominator.
Example: evaluate the following matrix expression (set array size to 2 x 2 first)
 ( 1    2 )
 (        )
 ( 3    4 )
------------
 ( 0    4 )
 (        )
 ( 6    2 )
Result (to 5 d.p.):
(  0.41667   0.5  )
(                 )
(  0.25      0.5  )
Check:
(  0   4  )       (  0.41667   0.5 )         (  1   2  )
(         )   x   (                )    =    (         )
(  6   2  )       (  0.25      0.5 )         (  3   4  )
Note that matrix multiplication is not commutative, so that the order
of multiplication is significant. You also need to set the matrix size
appropriately, in this case to 2x2.
Solving a set of linear equations.
The matrix division function gives us an intuitive and easily remembered
way of solving a set of linear equations by simply dividing a matrix containing
the constants by the coefficient matrix.
Example:
Given the set of linear equations:
 10x   +  2y  -  10z   =  16    )
-10x   +  5y  +  12z   =  7     )
  4x   +  6y  +  10z   =  36    )
This can be rewritten as a matrix expression:
(  10   2  -10   )       ( x )      (  16  )
( -10   5   12   )   x   ( y )   =  (  7   )
(   4   6   10   )       ( z )      (  36  )
To solve for (x y z) we do the equivalent of "dividing" both sides
by the coefficient matrix, so that:
( x )       (  16  )     /   (  10     2   -10  )
( y )   =   (  7   )    /    ( -10     5    12  )
( z )       (  36  )   /     (   4     6    10  )
(in reality we will be pre-multiplying by the inverse).
First set the matrix dimensions to 3 x 3 and enter the constants as
a 3 x 1 column matrix (just leave the other elements as zero):
1 2 3 16 0. 0. 7 0. 0. 36 0. 0.
Making sure all the cells are selected, we click on the shift
then the divide button (which will be showing ")/(").
Next we enter the coefficient matrix as a 3 x 3 matrix .
1 2 3 10 2 -10 -10 5 12 4 6 10
Finally we press the "=" button to get the resulting values for
x, y and z as another 3 x 1 matrix:
1 2 3 2 0. 0. 3 0. 0. 1 0. 0.
which gives us the solution x = 2, y = 3, z = 1.
In practice, it is probably a good idea to enter the coefficient matrix
first and save it in memory ready for use, because it is time consuming
to enter. You can also use one of the other memories for the constants.
This allows you to go back and correct errors without re-entering the whole
thing. Be careful when entering negative numbers to use the sign
change key "+/-" and not the minus key, which will evaluate the expression
using the numbers you entered so far!
Erroneous results can be produced where the set of equations is very
"stiff" or has no unique solution, and rounding errors may lead to inaccurate
results, if a result is produced at all. In these cases you will
need to use more sophisticated numerical techniques than those currently
provided by the built-in functions. If the coefficient matrix is singular
this is indicated by an overflow error.
T - Transpose
The T button computes the transpose of a matrix. If the matrix
is not square, the largest contained matrix is transposed, while the elements
outside the square are left unchanged.
inv - Inverse
Use this button (obtained by shift and the 1/x button) to
invert a matrix. Depending on the values of the elements, it may
not be possible to obtain the inverse, in which case you will get an overflow
error. An example is the inverse of the zero (null) matrix, which
is equivalent to taking the reciprocal of zero in scalar arithmetic.
A similar result is obtained if the matrix is singular.
The inverse can be used as a way of solving a set of linear equations,
although there are more efficient numerical methods. See the matrix
division example above.
det - Determinant
This computes the determinant of a matrix, and is found by using shift
with the "<" (backspace) button. The result is given in
the form of a scalar matrix, i.e. each of the diagonal elements contains
the computed determinant. A singular matrix will produce a determinant
of zero.
I - Unit matrix
The unit button generates a unit matrix, i.e. a matrix with zero elements
except for the diagonal elements which are one. It is obtained by
clicking on shift, when the unit button changes to I.
You can use the unit matrix to generate other diagonal matrices.
For example multiply the unit matrix by a constant, or use a simple scalar
multiplication by the unit matrix to obtain the diagonal elements of a
given matrix.
Working with vectors
If the number of I-direction cells is set to exactly 2 or 3 some additional
vector functions are available.
).( - Scalar Product
This button computes the scalar (dot) product of two vectors. The
result is a scalar value, which is represented as its product with the
unit matrix.
)x( - Vector
Product
This button computes the vector (cross) product of two vectors.
r-p - Rectangular
to Polar
Converts from rectangular
(cartesian) to
polar coordinates.
Use shift
and the plus button.
Example: Set number of I cells to 2, J cells to 1. Angle mode
is degrees. Enter the value 1.0 into both cells to give the
(x, y) coordinates.:
1. 1.
Now: shift r-p
, result:
1.4142135624 45.
The result is in (r, theta) coordinates, where 1.4142... is the square
root of 2 and the angle, theta, is 45 degrees.
If the number of I cells is set to 3, the rectangular coordinates are
given as (x, y, z) and the result is expressed in cylindrical polar coordinates
(r, theta, z).
p-r - Polar to Rectangular
Converts from polar to rectangular (cartesian) coordinates. Use shift
and the - button.
Take care that the angle, theta, is entered in the correct units depending
on the current angle mode.
Sample Problem
Traffic Flow
A proposal for a one-way system is being considered for Matrix Square.
The existing traffic flows as shown have already been measured.
It is also known that on average precisely fifty percent of the Durham
Avenue traffic goes down an underpass due to a confusing road sign.
Assuming no change to the external traffic flows, find the flow of cars per hour
through Acacia Street (A), Bond Road (B), Cornish Drive (C) and Durham
Avenue (D) given the measured traffic flows in the adjacent roads.
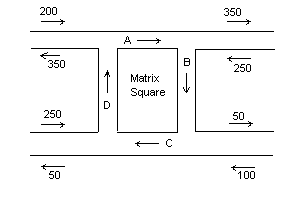
We need to collect the information we have available. Starting
with the junction entering Acacia Street, the net traffic flow must be
zero otherwise cars would accumulate at the junction (although in
practice this often seems to be what happens). The net flow per hour
consists of 200 cars entering the junction, 100 leaving plus whatever comes
through Durham Avenue (which does not use the underpass)
less the traffic out through Acacia Street, so:
200 - 100 + D/2 - A = 0, or -A + D/2 = -100
Looking at the other junctions in the same way:
A - B = 100
B - C = -200
C - D = 150
In matrix form:
( -1 0 0 0.5)
( A ) ( -100
)
( 1 -1 0 0 )
( B ) ( 100
)
( 0 1 -1 0 )
x ( C ) = ( -200
)
( 0 0 1 -1 )
( D ) ( 150 )
To obtain the solution for A, B, C and D we need to enter the constants
as a 4 x 1 column matrix (it is also worth saving it in a memory location)
1 2 3 4 -100. 0. 0. 0. 100. 0. 0. 0. -200. 0. 0. 0. 150. 0. 0. 0.
then use the matrix divide (")/(" = shift + "/") and then
enter the coefficient matrix. Tip: use the unit matrix (shift + unit) and
click on +/- to get all the diagonal elements, then add the off-diagonals
manually.
1 2 3 4 -1. 0. 0. 0.5 1. -1. 0. 0. 0. 1. -1. 0. 0. 0. 1. -1.
The result, a 4 x 1 matrix, gives us A = 150, B = 50, C = 250 and D = 100.
1 2 3 4 150. 0. 0. 0. 50. 0. 0. 0. 250. 0. 0. 0. 100. 0. 0. 0.
Armed with this information, the traffic engineer knows that Cornish
Drive needs to handle substantially more traffic than Bond Road,
and can alert the police to the 50 confused drivers who will
be using the underpass in any typical hour.
You may notice that a large proportion of the elements of this matrix
are zero. This is typical when representing physical problems of
networks or grids of points or control volumes, which result in very sparse
matrices with bands of non zero elements.